27 Basic Embroidery Stitches You Need to Know
Learning basic embroidery stitches is both fun and necessary if you want to enter into the fashion industry or craft world. Embroidery is a type of needlework wherein thread or yarn is used to decorate fabrics.
People from ancient ages all over the world used to wear embroidered garments. It is striking that no changes in materials or techniques can be felt or interpreted as advances from a primitive to a later stage. In fact, early-century works exhibit a high standard of craftsmanship, which is rarely found in later times.
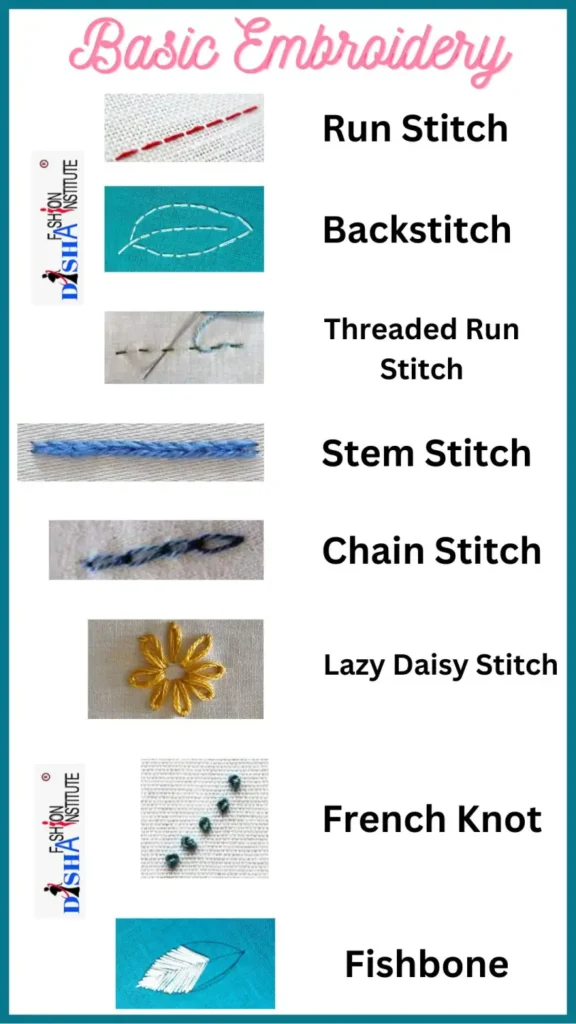
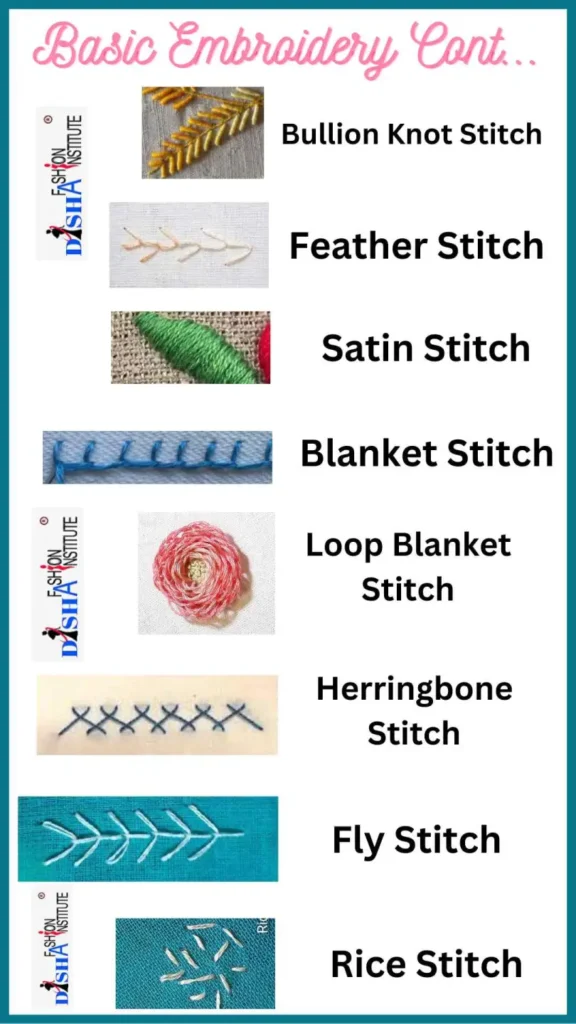
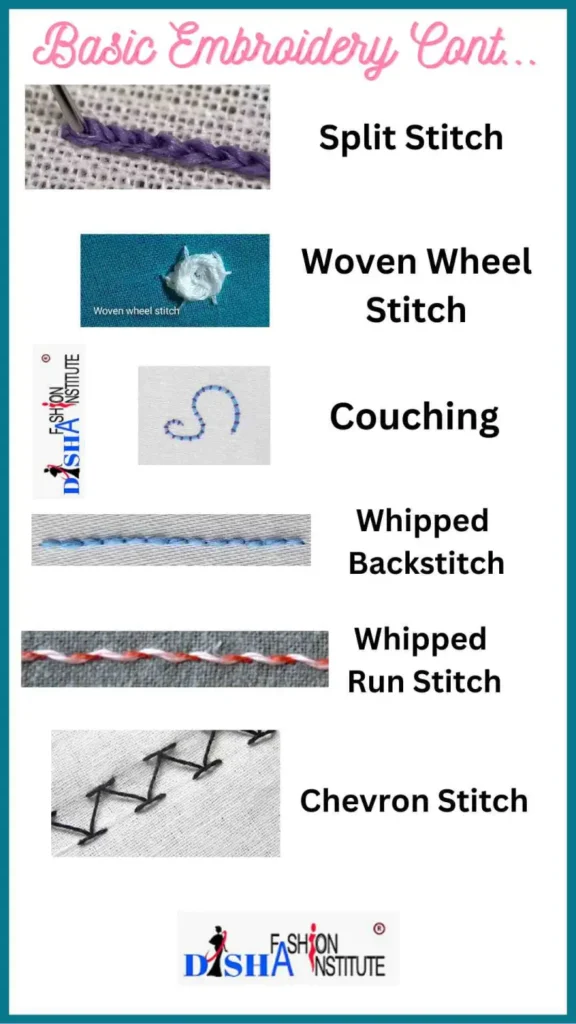
Table of Contents
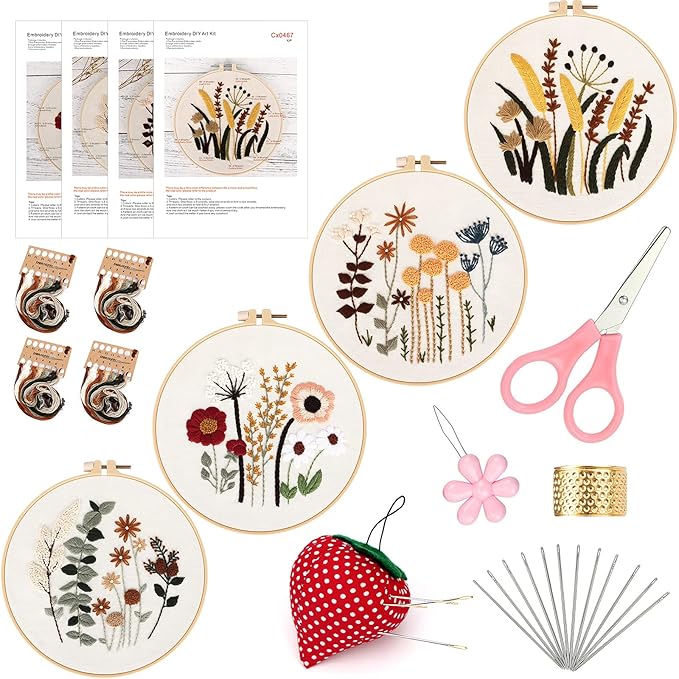
Materials Needed for Embroidery Stitching
- Embroidery Needle: Sizes from 1 to 10 are used most.
- Embroidery floss: 6 strands of thread twisted together is called floss. Good quality floss is needed for good embroidery.
- Scissors
- Embroidery hoop or frame: A hoop is needed to set the fabric during embroidery so that the fabric stays taut.
Different Types of Basic Embroidery Stitches
How to do Basic Embroidery Stitches
Watch the video to learn how to make different types of basic embroidery stitches step-by-step. This helpful video covers all the essential stitches so you can get started in the wonderful world of embroidery.
Depending on time, location, and materials available, embroidery can be found in different types, though the basic stitches remain almost the same. So, if you are a beginner, you must learn the following basic stitches for mastery and to be able to create wonderful embroidered pieces.
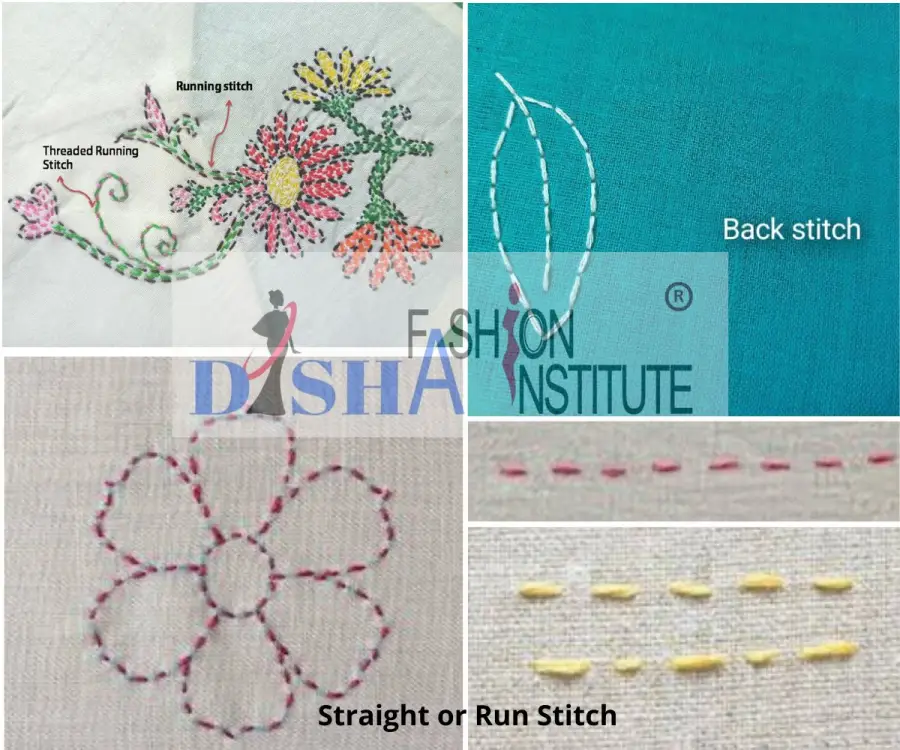
Running stitch
The most basic form of embroidery is the run stitch, a simple straight stitch used to create lines and outlines in a design. You can say that among all the existing embroidery stitches, running stitch or running stitch is the easiest. It is a very common stitch in the Kantha embroidery of Bengal. Traditional Sashiko embroidery in Japan also uses only running stitches.
This stitch is made by running the needle and thread up and down the cloth at a particular distance. To achieve the perfect look, keep the length of the stitches as identical as possible. Running stitch is also known as straight stitch.
Every embroiderer should know the run stitch, which is versatile and can be used to create a variety of designs.
Backstitch
The back stitch is done by taking the thread in the backward direction. There are no spaces between each stitch, giving the look of a continuous line.
Like the running stitch, the back stitch has variations. It is one of the basic embroidery stitches, worked by taking small stitches backwards and forward on the fabric. The back stitch usually works in a straight line but can also be used to follow a curve. It can be worked in a continuous line or as individual stitches.
Threaded Running Stitch
The embroidery stitch, known as the threaded running stitch, is one of the most basic and commonly used stitches in hand embroidery. This stitch is also known by a variety of other names, including the Holbein stitch and the Outline stitch. The threaded running stitch is worked by bringing the needle up through the fabric from the back side, then taking a small stitch on the surface of the fabric and bringing the needle back down through the fabric to the backside. The thread is then pulled tight, but not so tight that it pucks the fabric. This stitch is typically worked in a straight line, but can also be worked in a curved line.
It is basically done by passing the needle in and out of the fabric at regular intervals. The thread is then pulled through to the back of the fabric, and the needle is inserted again at the same point, forming a loop.
It is a variation of a running stitch. After the running stitch, another thread of the same colour as the running stitch or any contrast colour is passed through the stitches, creating a rope-like form. This is a very decorative stitch that can create beautiful borderlines.
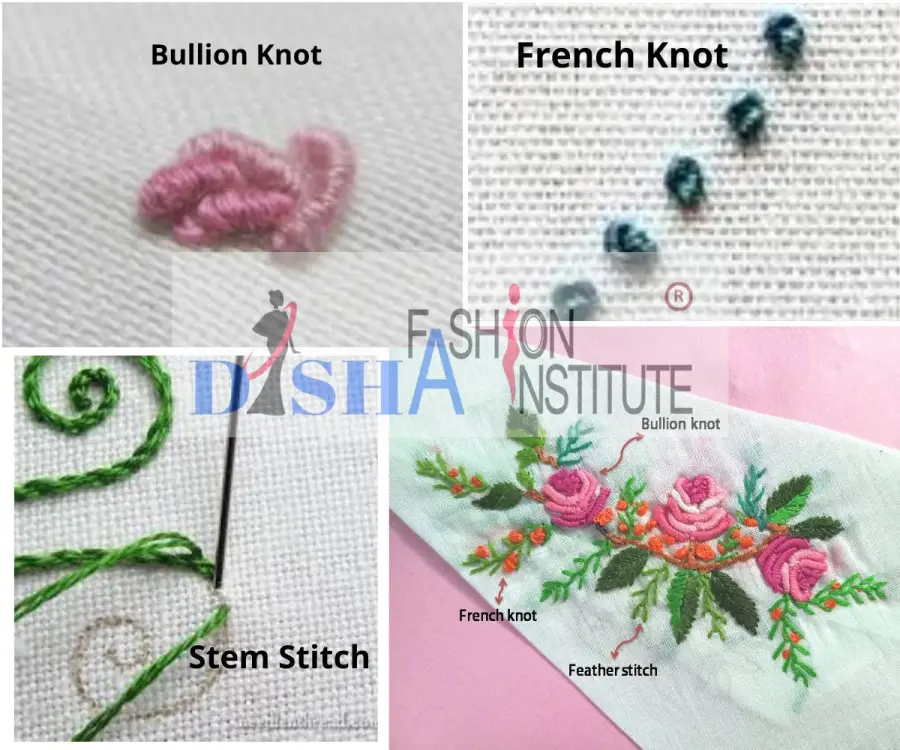
Stem Stitch
Stem stitch is one of the most common embroidery stitches. It creates a thin line that is generally used to form plant and flower stems. It is easy to create both straight and curved lines. It is a very common Kantha embroidery stitch in Bengal. Stem stitch is versatile, allowing it to be worked in straight or curved lines and creating a variety of different effects.
Chain stitch
Chain stitch is one of the oldest stitches practised worldwide. Like its name, it creates a chain-like appearance. Like run and stem stitch, chain stitch is very common in Kantha embroidery. It is also dominant in the Kashidakari embroidery of Kashmir.
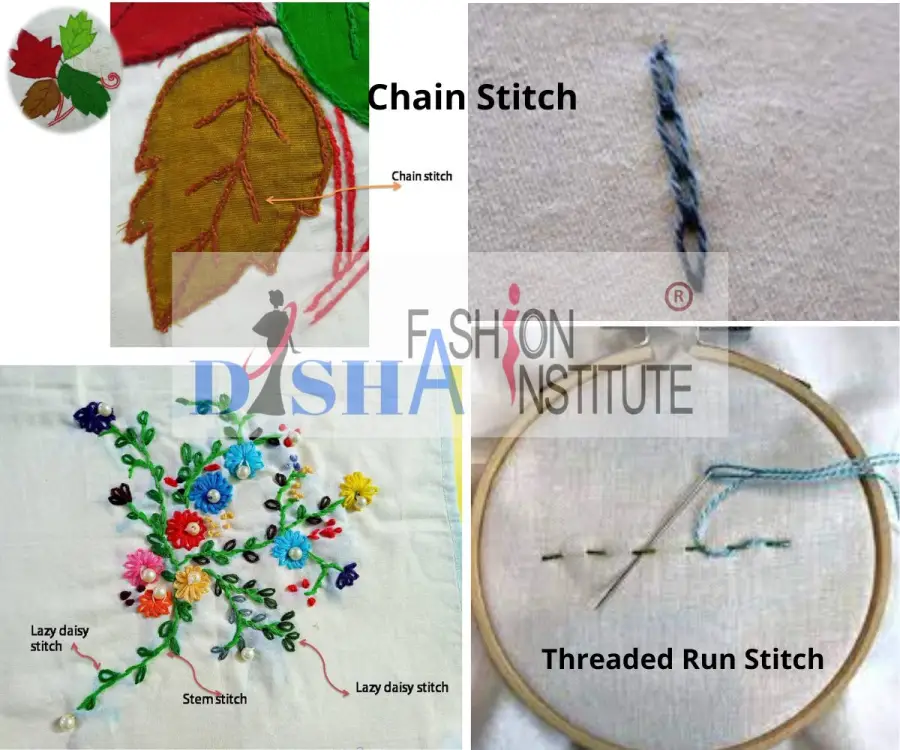
Chain stitch is one of the basic embroidery stitches and is worked in a continuous line. It can be worked in a straight line or a curved line and can be used to outline a shape or to fill in an area.
Lazy Daisy Stitch
Lazy daisy stitch is one of the most basic and commonly used embroidery stitches. It is a simple stitch that can be used to create a variety of patterns and designs.
This stitch is worked by bringing the needle up through the fabric and then making a small loop with the thread. The needle is then inserted back into the fabric a short distance from the first stitch and brought back up through the loop.
A lazy daisy stitch is a simple stitch that can be worked in various colours. It creates a variety of patterns and designs. The needle is brought up through the fabric and then made into a small loop with the thread. The needle is then inserted back into the fabric a short distance from the first stitch and brought back up through the loop.
It is almost like a chain stitch but detached, so it is also known as a detached chain stitch. It is a single-chain stitch, so it can be used in a flower form. It is the simplest stitch for embroidered flowers.
French Knot Stitch
If you’re new to embroidery, you may be wondering what a French knot is. French knots are one of the most basic embroidery stitches, and they’re great for adding texture and dimension to your project.
To make a French knot, start by bringing your needle up through the fabric. Then, wrap the thread around the needle a few times, i.e. give 5 to 7 knots in one stitch. Finally, insert the needle back into the fabric and pull it through until the knot is tight against the fabric.
French knots are a versatile stitch that can be used in a variety of ways. You can use them to create flowers, leaves, and other embellishments. They’re also great for filling in small spaces. If you’re looking to add some interest to your next embroidery project, give French knots a try! This stitch is used to do little flowers or as a filling stitch to fill in small circles or sometimes the centre of flowers.
Bullion Knot Stitch
It is a variation of French knots. This stitch gives a comparatively large knotted look, giving 12 to 15 knots in one stitch. Generally, bullion stitch is used to create flower petals, especially little rose flowers.
Blind Hem Stitch
It is one of the oldest stitches. Hemstitch, as its name defines, is used in the hemline of fabric to give a finished and smooth edge. Blind hemstitch is a type of hemstitch that is not shown from the right side of the fabric. So, it is termed a blind stitch. After folding the edge of the fabric, the hemstitch is done from the wrong side of the fabric.
If you want to learn about different types of hemstitch, then read our detailed blog post on hemstitch.
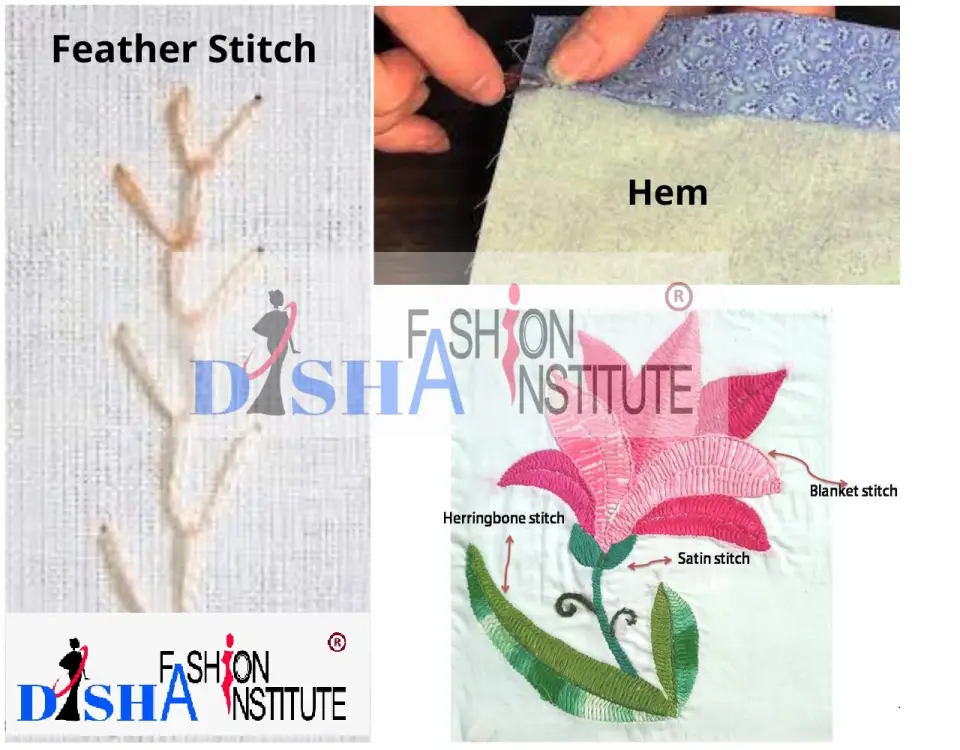
Feather stitch
A feather stitch is a decorative stitch that looks like a series of interconnected “Vs.” It can be used with embellishments like beads, pearls, and French knots on its head and can create decorative borderlines.
One of the basic embroidery stitches is the feather stitch, which can be used to create various effects. It can be used to create lines, fill in areas, or add texture to a design. The stitch is worked by bringing the needle up through the fabric and then taking a small stitch to the side. The needle is then brought up through the fabric again, and the stitch is repeated.
Satin Stitch
Satin stitch is very common in almost every country. It is heavily used in the traditional Phulkari embroidery of Punjab. It is basically a filling stitch used to fill spaces, flowers, plants, etc., with different colours. Embroidery with satin stitches gives a very colourful and vibrant look. Satin stitching is very simple, just like straight stitching. However, it becomes messy if the edges of the pattern are not neat.
Blanket stitch
Blanket stitch is one of the most versatile and commonly used stitches in embroidery. It can be used to finish raw edges, attach appliques, and create decorative designs.
This stitch gets its name from its original use: finishing the edges of blankets and quilts. It is worked around the edge of the fabric, creating a finished, decorative edge.
While blanket stitch is most commonly used in embroidery, it can also be used in other needlecrafts such as cross-stitch and needlepoint. This stitch is used in many regions while doing appliqué embroidery, as it secures the edges.
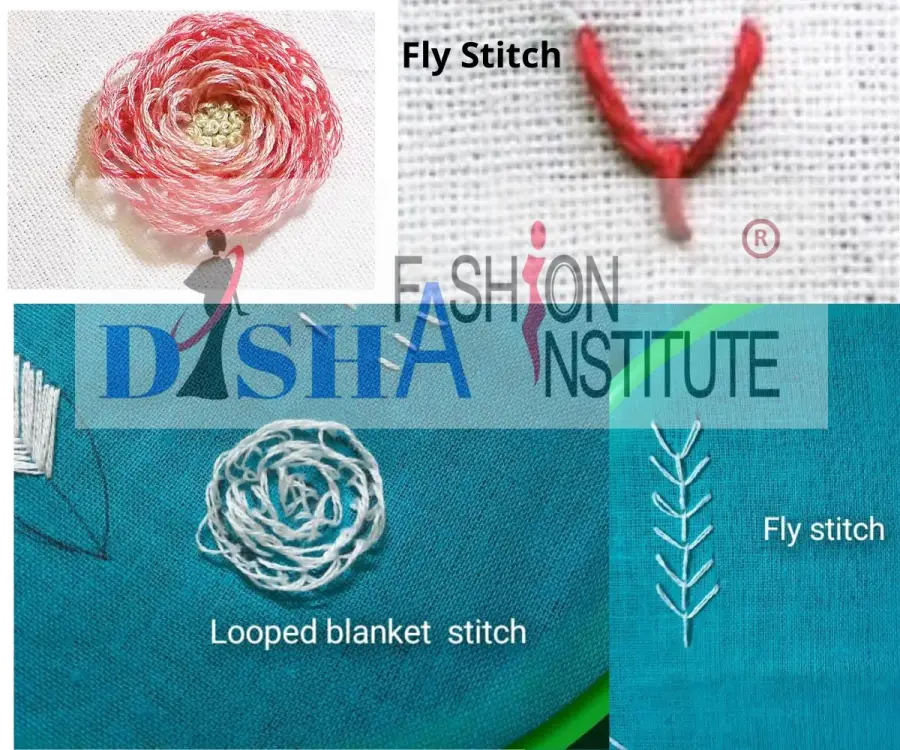
Looped blanket stitch
Looped blanket stitch is a basic embroidery stitch that is worked by passing the needle over two threads of the fabric and then under one thread. The needle is then passed back over the one thread to form a loop. This stitch is worked in a continuous manner, forming a line of stitches that resemble loops.
This stitch almost looks like a blanket stitch, though, in addition to loops. It is used for decorative purposes, such as creating embroidered flowers.
Herringbone stitch
Herringbone stitch is one of the basic embroidery stitches and is often used to create decorative borders. It’s a versatile stitch that can be used for both straight and curved lines.
To create a herringbone stitch, make a small knot at the end of the thread. Then, insert the needle into the fabric where the stitch starts. Pull the needle through to the back of the fabric. Next, insert the needle into the fabric a short distance away from where it first came out. Pull the needle through to the back of the fabric. You should now have a small loop of thread on the back of the fabric. To complete the stitch, insert the needle into the loop of the thread and pull it through. Now, you should have a small stitch on the front of the fabric. Repeat these steps to create additional stitches.
It is made of crosses, not in the middle but in the edges of the pattern. It is a filler stitch that can fill both large and small patterns in less time. We can use this versatile embroidery stitch to create embroidered leaves. It is commonly used in traditional Kantha embroidery.
Fly stitch
Just like the name, this stitch creates a look like a bird is flying or the English alphabet “Y”. With this stitch, you can create embroidered leaves or flying birds.
The fly stitch is one of the most basic embroidery stitches and has a long history. This stitch is often used to create a variety of simple geometric shapes. It is also used in freeform embroidery and can be combined with other stitches to create more complex designs.

Rice Stitch
A rice stitch is one of the basic embroidery stitches used to create a textured look on fabric. It consists of tiny stitches that resemble grains of rice. This stitch can be worked in a straight line or a curved line. It can be used to fill in small areas or to outline a design.
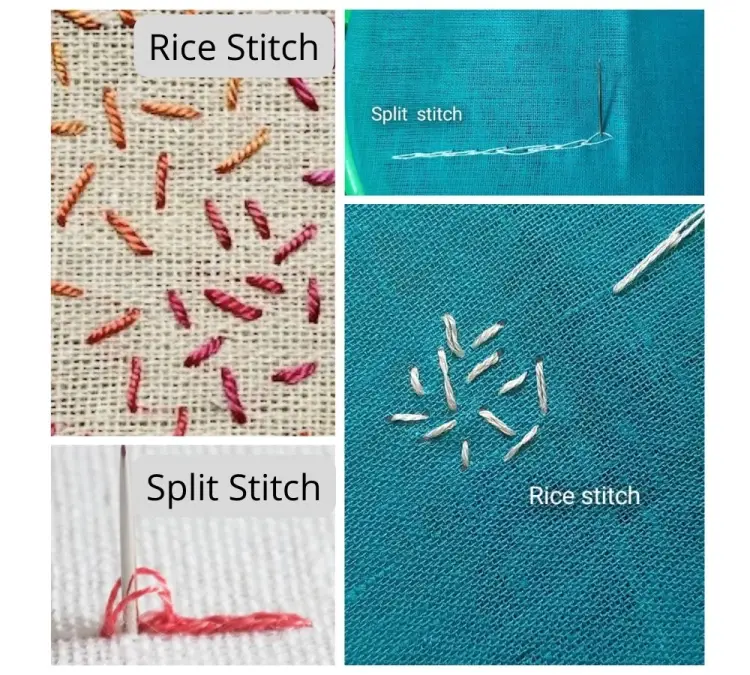
This is a variation of seed stitch. However, unlike seed stitch, it is done haphazardly to fill a pattern. It does not follow any particular line or pattern. Thus, it looks like a chaos of rice grains on the floor, hence its name.
Split Stitch
Split stitch is a basic embroidery stitch used to create smooth, slightly raised lines. It is formed by bringing the needle up through the fabric, making a forward stitch, and then inserting the needle back through the middle of the previous stitch, effectively “splitting” the thread. This technique results in a textured, rope-like effect, making it ideal for outlines, lettering, and delicate curves in embroidery designs.
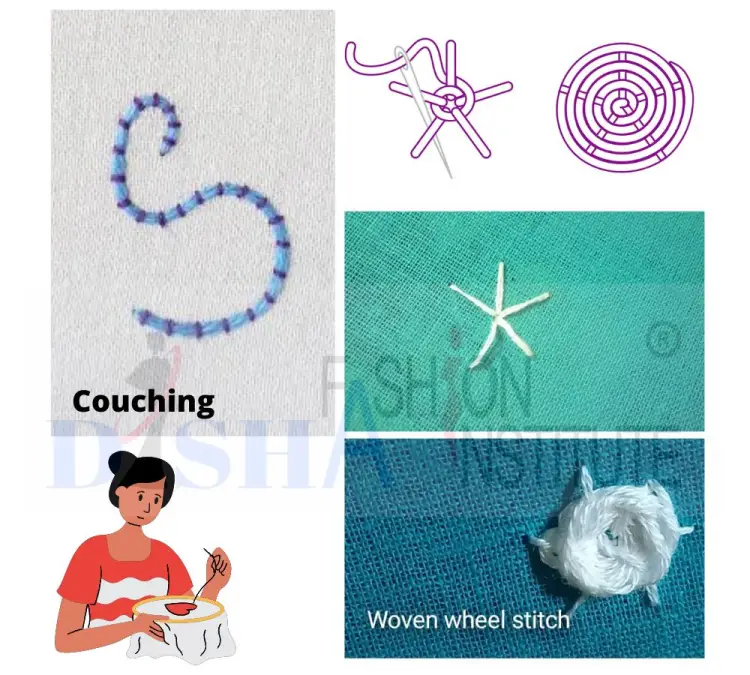
Woven Wheel Stitch
There are a variety of basic embroidery stitches, and one of the most popular is the woven wheel stitch. This stitch is created by first making a small loop with the thread. Next, the needle is inserted into the fabric at the base of the loop and pulled through to the top. Finally, the needle is inserted into the loop and pulled through to create a small knot.
This stitch is often used to create decorative borders or patterns on fabric. It’s relatively simple to master and can add a lot of interest to embroidery projects.
As it looks like a spider’s web, it is also called a Woven spider wheel. It is very decorative and easy to stitch. It can be done for embellishments or to create flower forms.
Couching Embroidery Stitch
Couching is an embroidery technique where a thicker thread or cord is laid on the fabric’s surface and secured in place with small stitches made using a finer thread. Instead of passing the thicker thread through the fabric, it remains on top while the finer thread tacks it down at intervals. This method allows for smooth curves, bold outlines, and intricate designs, making it popular in goldwork, crewel embroidery, and decorative textile art.
Couching is ideal for adding texture and dimension to embroidery and is often used for lettering, motifs, and elaborate embellishments.
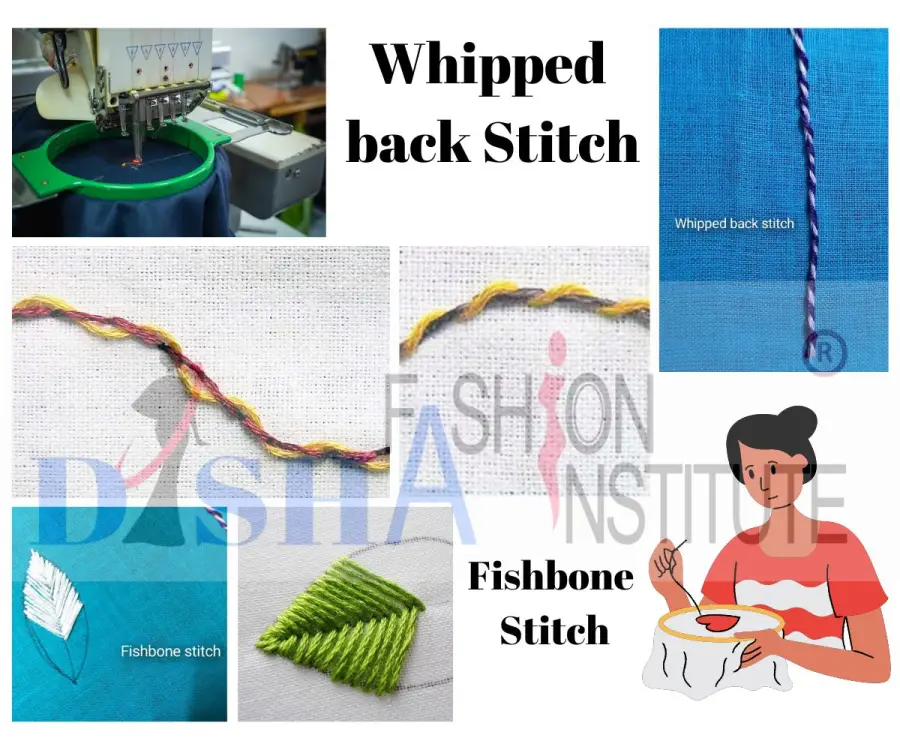
Whipped Backstitch
The whipped backstitch is an enhanced version of the basic backstitch, where a second thread is passed through the backstitch in a twisting motion without piercing the fabric. This creates a smooth, cord-like effect, adding dimension and decorative appeal to the embroidery. It is commonly used for bold outlines and lettering in embroidery designs.
Whipped Running Stitch
Whipped running stitch follows the same principle but is done over a basic running stitch. A second thread is looped around the running stitches in a spiral motion, giving it a braided or rope-like appearance. This stitch is great for decorative borders and outlines, adding texture and depth to simple designs.
Fishbone Stitch
Fishbone stitch is a popular embroidery stitch used primarily for filling shapes like leaves and feathers. It creates a smooth, overlapping effect that mimics the natural veins of a leaf. The stitch is worked in a staggered, alternating pattern, where each diagonal stitch slightly overlaps the previous one, forming a herringbone-like texture.
To create a fishbone stitch, start by bringing the needle up at the tip of the shape. Make a diagonal stitch to one side, then bring the needle up slightly below the starting point on the opposite side. Continue alternating sides, ensuring each stitch slightly overlaps the centre to create a smooth, seamless effect.
Fishbone stitch is commonly used in floral embroidery, decorative borders, and nature-inspired designs. It is an excellent choice for achieving a dimensional, textured look while maintaining a soft and organic flow.
Double Threaded Backstitch
A double-threaded backstitch is a decorative variation of the basic backstitch, where an additional thread is woven through the stitches to create a braided or interlaced effect. This technique enhances the texture and appearance of the backstitch, making it more visually appealing for decorative outlines and borders.
Double Threaded Running Stitch
Double-threaded running stitch is a decorative variation of the basic running stitch. Two additional threads are woven through the stitches to create an interlaced effect. This technique enhances the simple running stitch by adding texture and a braided appearance, making it ideal for decorative borders and outlines.
Seed Stitch
This is a simple running stitch with a shorter stitch and larger space between stitches of the stitching line. It is used to create a pattern. Seed stitch is a basic embroidery stitch that is worked by going over one thread and under the next. It is worked in a row and creates a nice, even texture.
The terms Seed stitch and Rice stitch are used interchangeably on the Internet. However, we use seed stitches if the stitches are in a straight line and rice stitches if they are haphazard.
Chevron Stitch
Chevron stitch is a decorative embroidery stitch that forms a continuous row of evenly spaced V-shaped stitches, creating a zigzag pattern. It is commonly used for borders, decorative bands, and geometric designs in embroidery.
Chevron stitch is made by bringing the needle up through the fabric at the starting point. Make a diagonal stitch down to the right, then bring the needle up slightly to the left of the previous stitch to form one side of the “V”. Repeat this process, maintaining even spacing to create a continuous chevron pattern.
This stitch is easy to learn and adds a structured, geometric touch to embroidery projects. It works well in both single-colour and multicolour designs, making it a versatile choice for decorative stitching.
Fabric Manipulation Smocking
Fabric Smocking is also an embroidery technique. It is a special type of decorative stitch that is done on gathered fabric. We have a separate blog post on Fabric smocking. Please click on the below button. It will redirect you to the blog post on fabric smocking.
Though there are at least 400 types of hand embroidery stitches worldwide, depending on the local environment, material, and skills, the running stitch is the easiest embroidery stitch ever. Running, back, stem, chain, French knot, and satin are the six basic stitches to learn for any beginner to start embroidery.
Join Tailoring Courses
| Tailoring Course | Duration | Admission Fee | Monthly Fee |
|---|---|---|---|
|
6 Months |
550/- |
700/- |
|
|
1 Year |
900/- |
1st Semester 700/- |
|
|
4 Months |
1000/- |
1200/- |
|
|
4 Months |
1000/- |
1200/- |