How to make an apron with pockets: A step-by-step guide
Looking to add a little more personality to your kitchen? Check out our guide on how to make an apron with pockets and without a pattern! Perfect for the amateur sewer, this guide provides concise and easy-to-follow instructions on how to make a one-of-a-kind apron that will show off your personality and keep your clothes clean.
Looking for a unique gift for the baker or cook in your life? Why not give them a personalized apron? With our guide on how to make an apron with pockets and without any pattern paper, you can easily sew a one-of-a-kind apron that the recipient is sure to love. This guide provides clear instructions and plenty of photos to help you along the way.
Do you love to cook but hate getting your clothes dirty? With an apron with pockets, you can keep your clothes clean and your hands free while you cook. Our guide on how to make an apron with pockets will show you how to sew a simple and stylish apron that you can use again and again.
The collar is the part of the dress that covers the neck area and it is a key element in any dress. The collar can be made from different materials such as cotton, silk, lace, or tulle. It could have a variety of shapes such as round, square, or V-shaped. It could also have a variety of styles like standing up straight or hanging down in an open way.
Table of Contents:
- How to Choose the Right Material for Your Apron
- Sewing Tools and Materials required
- Process of making the apron
- Step 1: Folding the fabric into 4 layers
- Step 2:Mark the length of the apron
- Step 3:Mark upper chest
- Step 3:Hip round measurement and the curve line from upper chest
- Step 4:Cutting Process
- Step 5:Make the pocket
- Step 5:Making the neckband
- Step 6:Attaching the neckband and the belts
- Your Apron is ready
- Step by step video tutorial to make an apron
- List of Certificate Courses offered by Disha Fashion Institute
- Other Topics
How to Choose the Right Material for Your Apron
When it comes to choosing the right material for your apron, there are a few things you need to take into account. The first is the purpose of the apron. Are you looking for something to protect your clothes from spills and splatters while you cook? Or are you looking for something a little more stylish to wear while you entertain guests?
The second thing to consider is the material itself. Aprons can be made from a variety of materials, including cotton, denim, polyester, and leather. Each material has its own benefits and drawbacks, so it's important to choose the right one for your needs.
Cotton aprons are lightweight and comfortable, but they can stain easily. Denim aprons are durable and stylish, but they can be a bit heavy. Polyester aprons are easy to clean and wrinkle-resistant, but they might not be as comfortable as other materials. Leather aprons are stylish and durable, but they can be expensive.
No matter what material you choose, make sure it's the right one for you. With so many options available, there's no reason to settle for anything less than the perfect apron for your needs.
Sewing Tools and Materials required
- Fabric - 1 meter
- Thread
- Scissor
- Measuring tape
- Ball pin or Cloth pin
- Sewing machine
- Chalk or fabric marker
If you don't have a sewing machine, you can hand-sew the apron, but it will take longer.
Process of making the apron
Note: All the measurements given in this guide to make an apron, are including the seam allowance.
Step 1: Folding the fabric into 4 layers
Fold the fabric in 4 layers. So you need to double fold the fabric as shown in the figure. At first, take the fabric lengthwise and fold to the right side such that the raw edge will overlap with each other. This will create one fold or 2 layers. Then again fold in the same way, lengthwise facing right, such that the folded side will now overlap with the raw edge side.

Step 2:Mark the length of the apron
Mark the length from top to bottom as per the length you have measured while doing the body measurement. Here we are taking 27 inches in length. You can take the length as per your requirement. Make a horizontal line on the mark as shown in the figure.
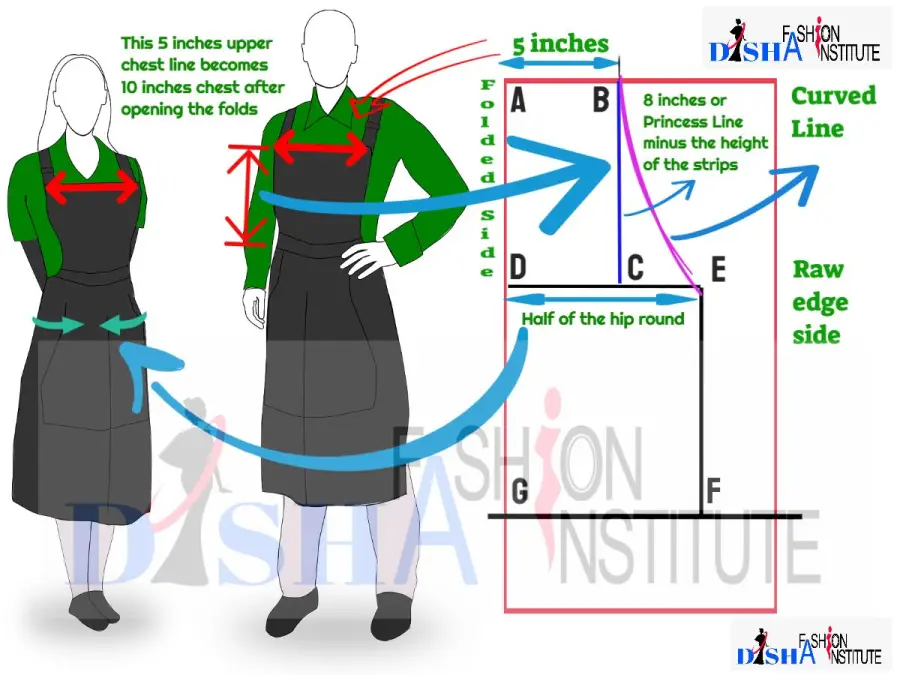
Step 3:Mark upper chest
The upper chest measurement needs to be taken from 4 to 6 inches. 4 inches for small size, 5 inches for medium and 6 inches for large size.

Step 4:Hip round measurement and the curve line from the upper chest
Measure 8 inches vertically downwards from the upper chest mark you have taken in the previous step. Point B to C in the below picture. You can take it 8 inches or 10 inches as per standard. But you can also take a body measurement to make it perfect. This is the length of the princess line minus the height of the strips of the apron. (Note: Princess line is nothing but the length from the shoulder to the waistline.)
After that, measure your hip around and divide it by 2. Take that length by marking from D to E, passing through point C. So if your hip round is 28 inches then the length of D to E will be 14 inches. This will be 12 to 14 inches standard depending on the average body shape. We would suggest measuring your hip around length for a perfect fit. Now make a curved line from B to E as shown in the figure. You can use a styling design ruler to make this curve. Instead of a curve line, you can draw a slant line as well. But we have made the apron with the curved style for this blog post and the video.
Step 5:Cutting Process
Now cut the fabric along with the cutting line. Your scissor should start from point A through points B, E, and F and end at point G.
Once you have cut the fabric and unfolded the double folded fabric to a single fold, you will get the fabric in the shape shown in the below picture. Now cut the folded side of the fabric to get two equal parts of the apron. One for the front side and one for the backside.

Step 6:Make the pocket
Make the pocket with a different color fabric. We would suggest taking a complementary color fabric. Take the fabric of the pocket with 12 inches in length by 8 inches in breadth. Place the fabric at the center of one of the cut pieces you have got in the previous step. Measure 12 inches from the midpoint of the top of the cut piece and place the pocket at the end of 12 inches. Check the above picture to understand the placement of the pocket.
Before attaching the pocket, make sure that the open end of the pocket at the top should have been folded half inches twice(double fold) and sewn through to finish the edge. Because the opening end of the pocket cannot be kept as a raw edge. The sewn process of the pocket to the apron has been shown in the video. You need to attach the pocket with the apron cut piece using ball pins or cloth pins so that while sewing using the sewing machine the position of the pocket will not be changed. You will sew 3 sides of the pocket leaving the upper side, as that is the open side of the pocket. Make sure that all the sides are properly aligned in the apron and that neither side has not become slant while sewing.
You can sew the pocket in the middle vertically to divide the pocket in two parts. This is upto your personal choice to keep one pocket only or divide it into two parts.
Step 6:Making the neckband
You can make an elastic nake band by using the fabric strip and an elastic. Alternatively, you can make a belt using the fabric only to create the neck band. You can take the same fabric to create the strip by which you have made the pocket. Otherwise, you can take the fabric from which you have made the bodice of the apron. In both the cases take a 23 inches by 4 inches fabric. Fold the fabric lengthwise from both edges and make a final fold from the middle and sew the edge. Please see the video to understand the folding process and the sewing process. After sewing, you need to turn the fabric inside out using a pen or using your finger only.
Make two more similar belts. If you want to make an elastic neck band then insert an elastic of length 18 inches inside.
Step 6:Attaching the neckband and the belts
Now keep the neckband as shown in pictures 1 and 2 in one layer. Then put the reverse side of the other layer on the top of the neckband as shown in picture 2. In the same way, place the belts between the two layers as shown in pictures 4 and 5. Please note that we will attach only one side of the two belts. The other sides will remain open so that you can tie the knot at the waistline using the belt. Now sew all 4 sides of the pair of layers. But keep a 5 inches gap in the bottom part. Do not sew that. This is required because once the sewing is done you need to turn the fabric inside out from that 5 inches gap. Please watch the video to understand how it is done. Your apron is ready.

Your Apron is ready
Step by step video tutorial to make an apron
List of Certificate Courses offered by Disha Fashion Institute
| Tailoring Course Name | Duration | Admission Fee | Monthly Fee | Syllabus |
| Diploma in Sewing and Designing | 6 Months | 530/- | 700/- | Basic Tailoring Course |
| Diploma in Dress Designing | 9 Months | 900/- | 1000/- | Advanced Tailoring Course |
| Blouse Designing Course | 4 Months | 1000/- | 1200/- | Blouse Designing Course |
| Kurti Designing Course | 4 Months | 1000/- | 1200/- | Kurti Designing Course |